Your Guide to the Perfect Studio Recording Room
- contact733797
- Aug 11, 2025
- 14 min read
A professional studio recording room is so much more than just a quiet space with a microphone. It’s an environment meticulously engineered for sonic purity. Think of it like this: your home kitchen gets the job done, but a Michelin-star chef’s kitchen is designed from the ground up for absolute perfection. That’s the leap we’re talking about.
What Makes a Room a Professional Recording Studio
Ever listened to a professionally produced track and wondered how it gets that crystal-clear, polished sound? The secret isn't just in the expensive gear; it's baked into the very design of the room itself. A purpose-built studio stands on two fundamental pillars: sound isolation and acoustic treatment. Getting your head around these concepts is the first real step toward achieving pro-level audio, whether you’re in a world-class facility or a corner of your bedroom.
Sound Isolation: Your First Line of Defence
First up, sound isolation. This is all about keeping the outside world out. It’s the defensive strategy that stops unwanted noise—rumbling traffic, your neighbour's dog, the hum of the air-con—from creeping into your microphone and ruining a perfect take. Pros achieve this with heavy-duty construction methods, like building a "room-within-a-room," using incredibly dense materials, and sealing every single air gap.
Acoustic Treatment: Taming the Sound Inside
Acoustic treatment, on the other hand, is about managing the sound inside the room. When you make a sound, whether it’s your voice or a guitar, those sound waves fly out and bounce off every surface—walls, floor, ceiling. Without treatment, you get a messy cocktail of echoes and reflections called reverberation. Treatment uses tools like absorbers (to soak up sound) and diffusers (to scatter it) to control those reflections. The goal is to make sure your mic captures the pure, direct sound from the source, not a muddled mess of room noise.
This is where the real gap between a DIY space and a professional studio opens up. A professional studio has invested heavily in creating this controlled environment. These spaces have been a cornerstone of Australia's creative economy for decades. In fact, way back in the 1995-96 financial year, the industry already employed around 800 people, with 66% of studios reporting income from recording activities. You can dig into more of this history on the Australian Bureau of Statistics website.
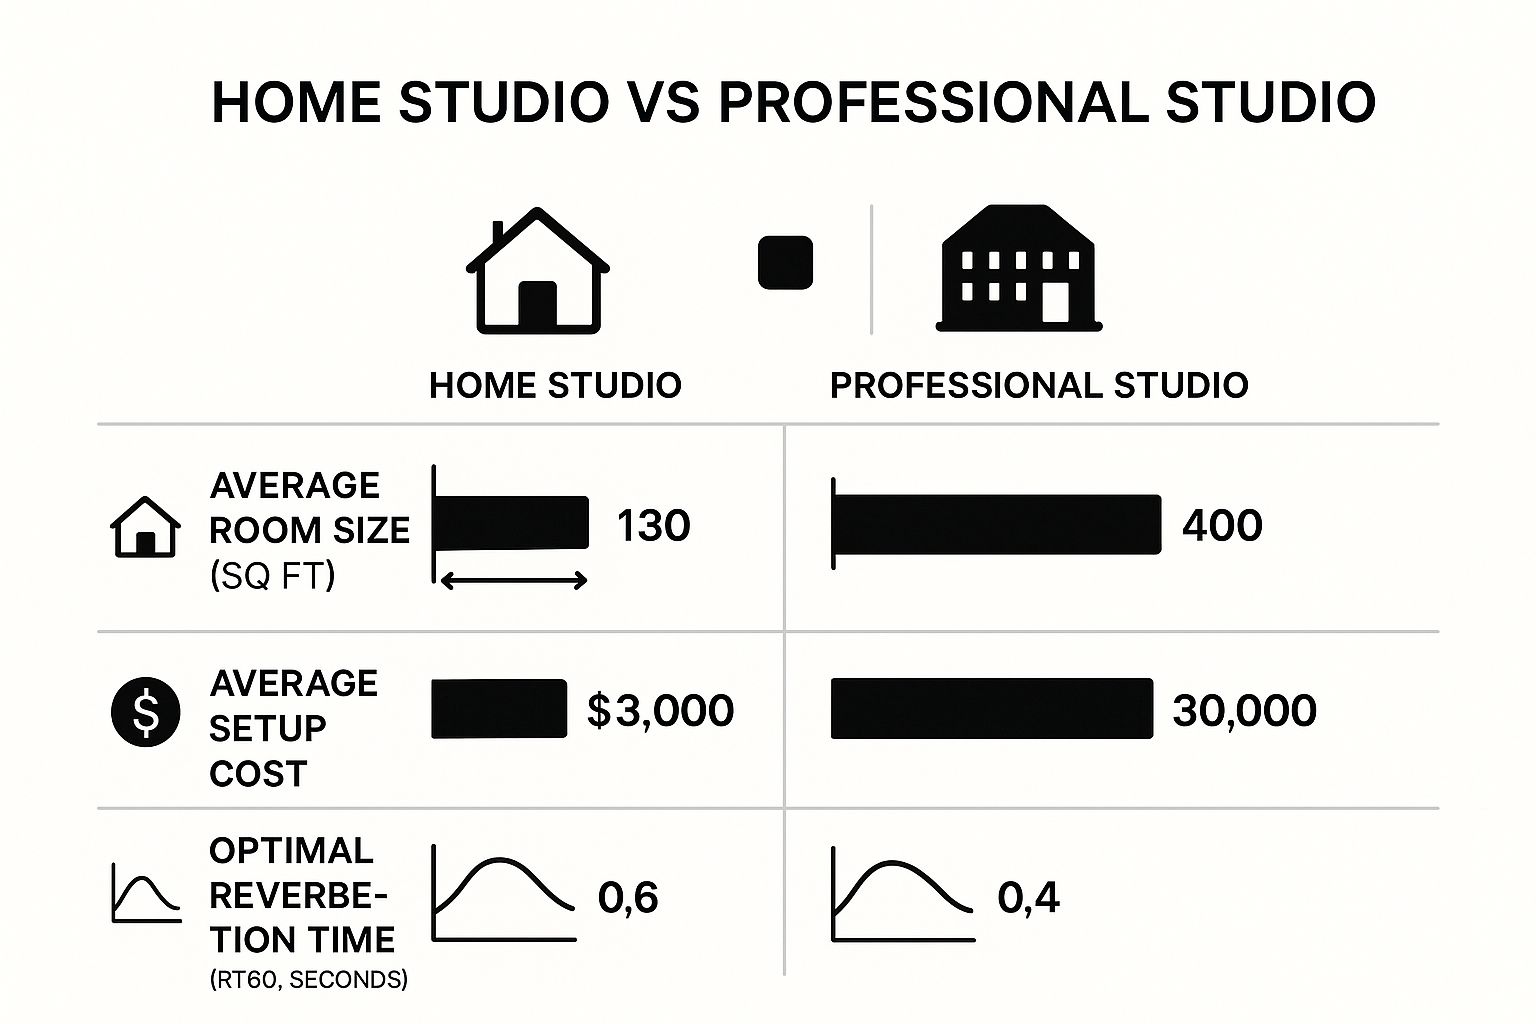
To give you a clearer picture, let's break down the main differences between a professional space and what most people can manage at home.
Professional Studio vs DIY Space Key Differences
Feature | Professional Studio Recording Room | Typical DIY Space |
|---|---|---|
Acoustics | Professionally designed with measured sound isolation and acoustic treatment. | Often has untreated reflections, echo, and poor sound isolation. |
Noise Floor | Extremely low; designed to be silent to capture pristine audio. | Susceptible to background noise from appliances, traffic, and neighbours. |
Construction | Often a "room-within-a-room" build with dense, specialised materials. | Standard residential construction with minimal soundproofing. |
Equipment | High-end, industry-standard microphones, preamps, and monitoring systems. | Consumer or "prosumer" grade gear, often limited in scope. |
Cost | Significant investment, often tens or hundreds of thousands of dollars to build. | Can be set up on a budget, but acoustic improvements can be costly. |
As the table shows, there’s a world of difference. A home setup is fantastic for accessibility, but a professional space is an entirely different beast, built for one purpose: optimal sound.
For creators who need that professional polish without the massive upfront cost, exploring options for recording studio hire in Melbourne can be the perfect solution. It gives you access to a top-tier environment without the mortgage.
A great recording begins with a great room. You can have the most expensive microphone in the world, but if the room sounds bad, the recording will sound bad. It’s the foundational element that everything else is built upon.
Ultimately, whether you decide to build your own treated space or hire a professional one, understanding these fundamentals is what will elevate your audio from amateur to polished and ready for release.
Taming Sound With Effective Acoustic Treatment
Picture tossing a pebble into a still pond. You see the ripples spread out, hit the edges, and then bounce back, crossing over each other in a messy pattern. In a studio recording room, sound waves do the exact same thing, just with the walls, ceiling, and floor. Acoustic treatment is simply the science of taming those bounces to capture beautifully clear audio.
Without it, you end up battling the three classic villains of clean sound. First, you get harsh echoes and flutter—those sharp, slap-back reflections that make a room sound like an empty hall. Then there's the messy reverberation, a wash of sound that smears all the fine details and leaves your recordings sounding distant and amateurish. And finally, you get those booming bass frequencies that love to pile up in corners, creating a muddy, uneven low end.
To fight back, you need the right tools for the job. Each piece of acoustic treatment has a specific role to play in managing how sound behaves, turning a sonically chaotic room into a controlled, professional space.
The Tools of Acoustic Control
It's important to understand that acoustic treatment isn't the same as soundproofing. You're not trying to block noise from getting in or out; you're sculpting the sound that's already inside the room. The main tools you'll use are absorption, diffusion, and bass trapping.
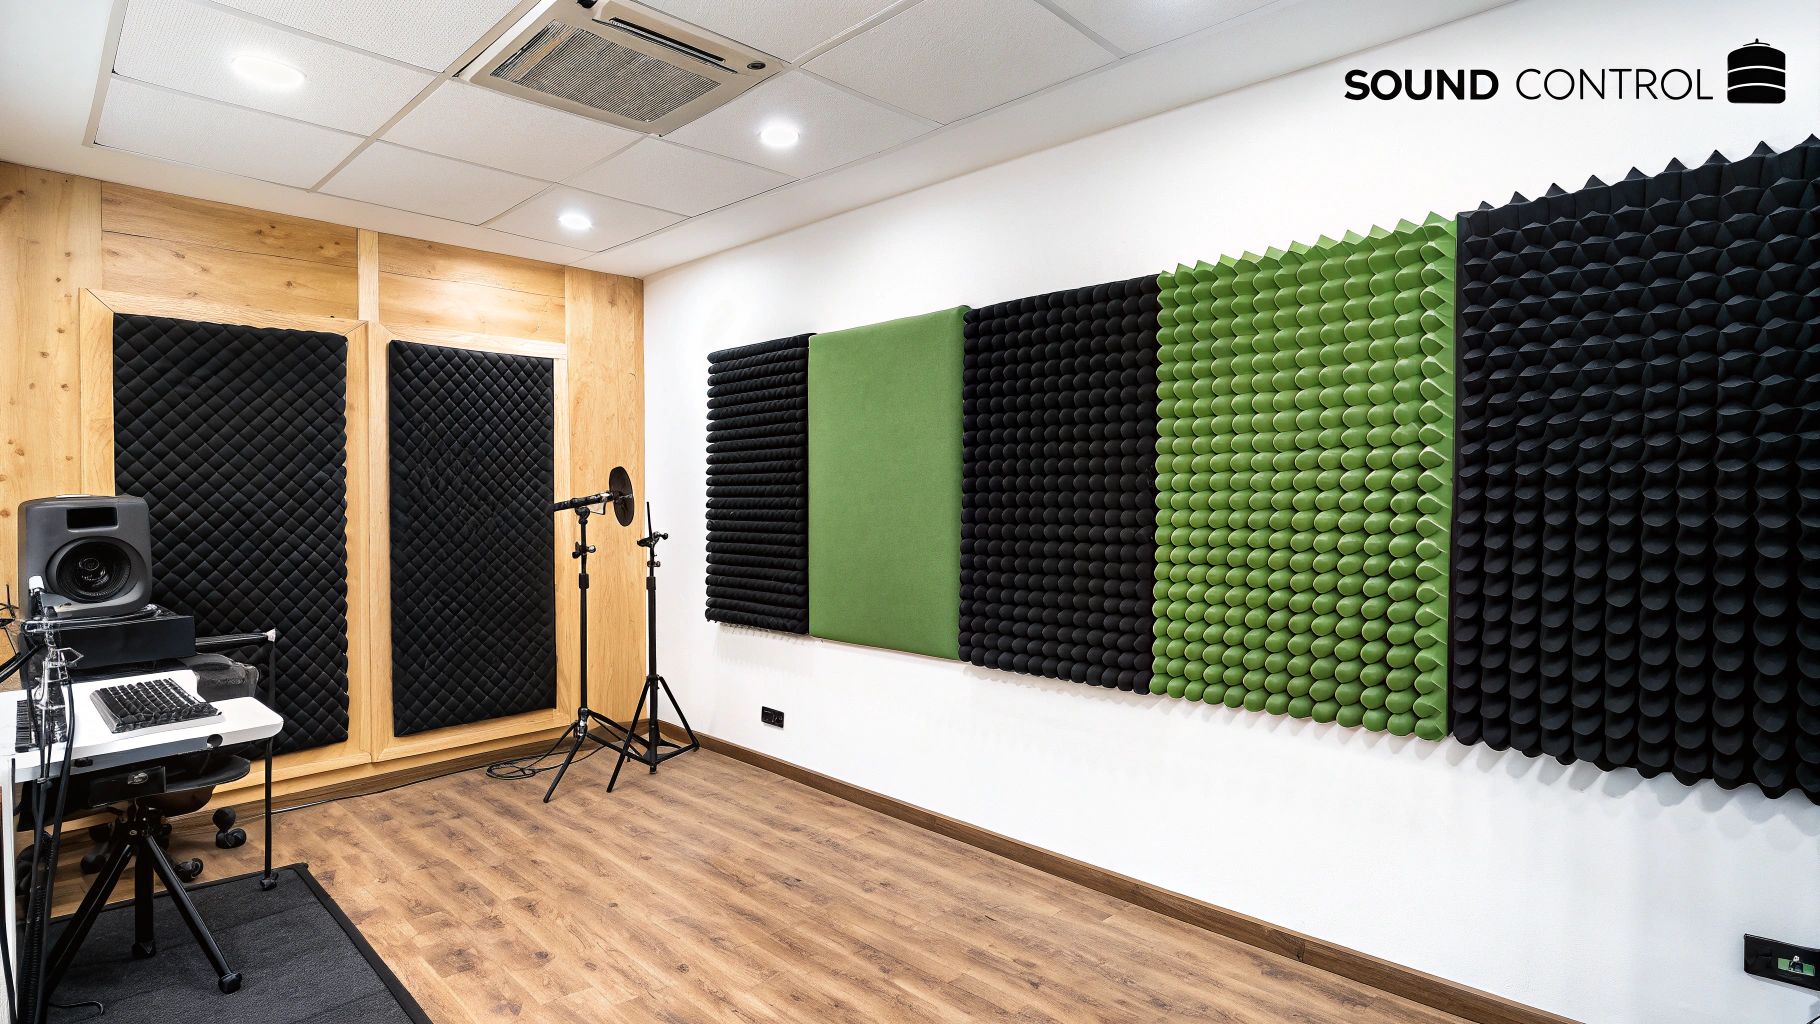
Absorption Panels: Think of these as the sponges of the acoustic world. Usually made from porous materials like dense fibreglass or acoustic foam, they soak up sound energy, turning it into a tiny amount of heat. This stops sound waves from bouncing off flat surfaces, which is fantastic for killing echoes and cutting down on overall reverberation.
Diffusers: If absorbers are sponges, then diffusers are like prisms for sound. Instead of soaking up sound, these panels have varied, complex surfaces that scatter the sound waves in many different directions. This breaks up those hard, direct reflections without making the room sound completely "dead," helping it retain a natural sense of space and life.
Bass Traps: These are the heavy hitters, specifically designed to deal with the most troublesome frequencies—the low end. Bass energy is incredibly powerful and tends to build up in the corners of a room, creating what are called "standing waves." Placing bass traps in the corners is the single most effective thing you can do to tighten up a boomy, uncontrolled bass response.
Where to Place Your Treatment for Maximum Impact
The good news is you don't need to plaster every surface of your room to get great results. It's all about strategic placement, and the first place you should always treat is what we call the first reflection points. These are the spots on your side walls, ceiling, and the wall behind you where sound from your monitors (or your voice) takes its first bounce before hitting your ears.
There's a tried-and-true way to find these spots: the "mirror trick." Sit in your main listening position and have a friend slide a small mirror flat along the side walls. Any spot where you can see the reflection of one of your speakers in the mirror is a first reflection point. Pop an absorption panel right there.
By starting with these critical points and adding bass traps to the corners, you can make a huge, immediately noticeable difference. This targeted approach lets you transform the sound of your studio recording room without breaking the bank, turning a sonically messy space into one that’s clear, focused, and ready to capture incredible audio.
Choosing Your Essential Recording Gear
While your room’s acoustics are the foundation, your gear is what truly captures the character and quality of your sound. Diving into equipment can feel a bit overwhelming at first, but a ‘quality over quantity’ mindset is your best friend here. You really only need a few core components working together to capture professional-grade audio.
The key is understanding how these pieces talk to each other. Think of it as a journey your sound takes, starting as a physical wave in the air and ending up as digital data on your computer. This pathway is called the signal chain, and it’s the beating heart of every modern studio.
The Core Components of Your Signal Chain
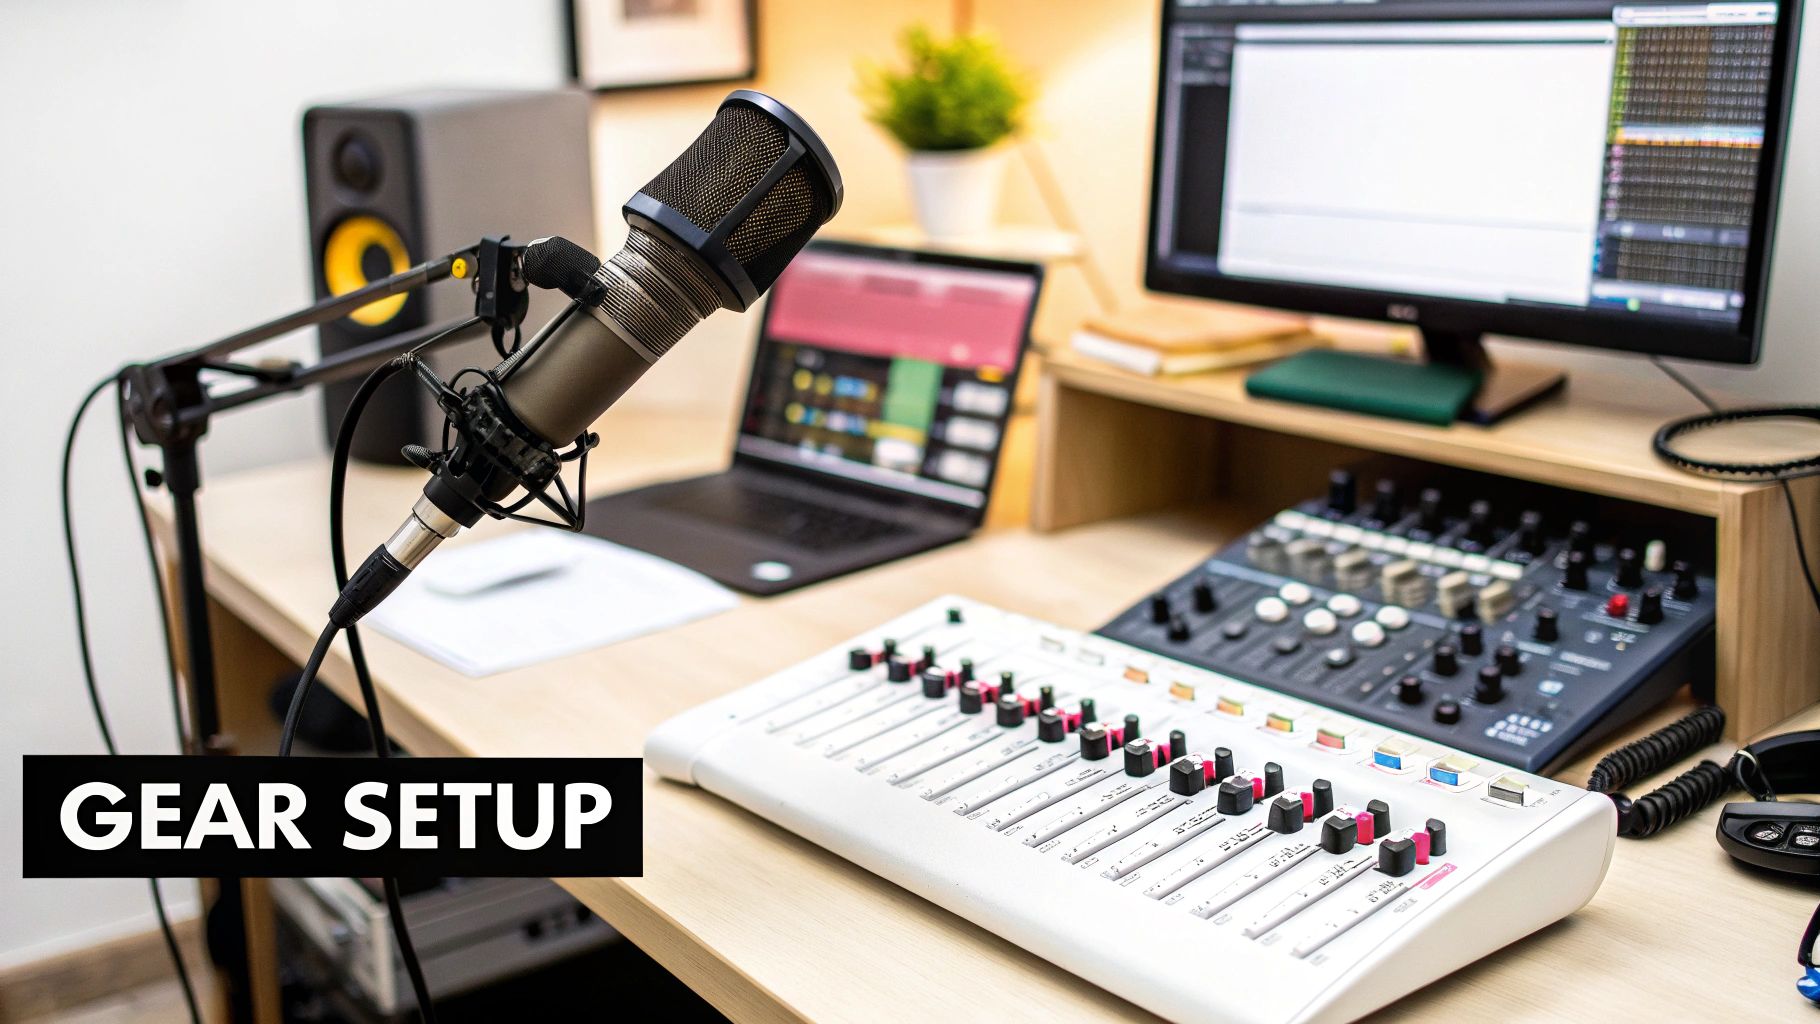
Your signal chain begins at the microphone and finishes inside your computer. Each piece of equipment along the way translates the sound for the next step, so the quality of every link in that chain matters.
Microphone: This is where it all starts. The mic captures sound waves and converts them into an electrical signal. Your choice between a dynamic or condenser mic really comes down to what you're recording. Dynamic mics are workhorses—tough and brilliant for loud sources like drum kits or guitar amps. Condenser mics, on the other hand, are more sensitive and excel at capturing the subtle details in vocals or acoustic instruments.
Audio Interface: Think of this as the translator between your microphone's analogue world and your computer's digital one. It houses a crucial component called a preamplifier (or preamp) to boost the mic's very weak signal to a usable level. Then, its analogue-to-digital converter (ADC) turns that signal into the ones and zeros your computer understands.
DAW (Digital Audio Workstation): This is the software where all the magic happens—your central hub for recording, editing, and mixing. It's your digital canvas, with programs like Ableton Live, Logic Pro, or Pro Tools acting as your brushes and paints.
Studio Monitors and Headphones: These are your honest critics. Studio monitors aren't like regular hi-fi speakers; they're designed for a "flat" frequency response to tell you the unvarnished truth about your audio, warts and all. Headphones are just as vital, especially for tracking, as they let a performer hear themselves clearly without that sound bleeding back into the microphone.
Quality Over Quantity Is Key
Building a great studio recording room isn’t about an arms race to get the most gear. The real focus should always be on high-quality essentials that serve your specific goals. Honestly, a single, excellent microphone will serve you far better than a dozen mediocre ones.
Australia has a rich history of studios pushing for the absolute best gear. For instance, the legendary Armstrong Studios in Melbourne installed one of the country's first 8-track recorders back in 1968, constantly chasing better technology. You can learn more about how they pioneered recording standards in Australia.
When you're just starting out, put your money into the best microphone and audio interface you can afford. These two pieces have the single biggest impact on your raw recording quality. You can always expand your gear collection later on.
Choosing the right microphone is often the most important first decision you'll make. For a much deeper look into what might work for you, check out our guide on the top 7 best microphones for home studio retailers in 2025. By focusing on these core pieces, you'll be well on your way to building a powerful and effective setup for any project you can dream up.
Designing Your Room Layout for Flawless Audio
So, you've invested in some solid acoustic treatment and have your gear ready to go. The next big piece of the puzzle is figuring out where everything should live. How you physically arrange your desk, speakers, and microphone inside your studio recording room is every bit as important as the quality of the equipment you bought. A smart layout is the secret to unlocking both audio clarity and a smooth, creative workflow.
The main aim here is to build a listening environment you can trust. You need to know that what you're hearing from your speakers is an accurate representation of your audio. This all starts with finding the 'sweet spot'—that one single place to sit where you get the truest sound. It's not some mythical spot; it’s a calculated position that guarantees you hear the most balanced version of your mix.
Finding the Sweet Spot with the Equilateral Triangle
The industry-standard technique for placing your speakers is the equilateral triangle method. It’s simpler than it sounds. Picture a triangle where all three sides are exactly the same length. Your head is one point of the triangle, and your left and right studio monitors are the other two.
This setup ensures the sound from both speakers hits your ears at precisely the same moment. The payoff? A razor-sharp, focused stereo image. You’ll be able to hear exactly where every instrument sits in the mix, from hard left to hard right. If your triangle is lopsided, your entire perception of the stereo field will be thrown off.
Desk Position and Symmetry
Your desk placement is the foundational decision. For the best results, you'll want to face the shorter wall in a rectangular room. This gives the sound waves a longer path to travel behind you before they can bounce back, which helps to weaken nasty early reflections.
Most importantly, your setup needs to be symmetrical. Your listening position must be perfectly centred between the left and right walls.
Think of a line drawn straight down the middle of your room, from the wall you're facing to the one behind you. Your chair, desk, and computer screen should all live on this centre line. This symmetry is crucial because it ensures the sound reflecting off the side walls is identical, giving you a balanced and reliable stereo image. If you're off-centre, you can easily be fooled into thinking one side of your mix is louder than it really is.
Microphone Placement for Clean Recordings
Finally, let's talk about where to record. While your listening position is pretty much locked in, your microphone placement can be more flexible. The golden rule is to keep the mic away from the exact centre of the room and well clear of any walls.
Here are a few tips to get cleaner recordings:
Avoid the Centre: The dead centre of a room is often a "pressure zone" where standing waves build up, creating a really unnatural sound with weird frequency peaks and dips.
Keep Your Distance from Walls: A mic placed too close to a wall will pick up immediate reflections, giving your recording a cheap, boxy sound. Aim for at least one metre of space as a good rule of thumb.
Use Gobos or Partitions: If you need extra isolation, portable acoustic panels (often called 'gobos') are a fantastic tool. You can place them around the microphone to create a small, controlled "vocal booth" on the fly.
By taking the time to nail these layout principles, you're not just organising your space—you're acoustically optimising it. This foundation ensures every mixing or recording decision you make in your studio recording room is based on accurate sound, which ultimately leads to a far more professional final product.
How Top Creators Use Recording Studios Today
The humble studio recording room has evolved. It’s no longer just a place for musicians to lay down tracks for an album. Today, it’s a critical creative hub for all sorts of creators, serving as the professional engine room for everything from chart-topping podcasts to crystal-clear film dialogue. A purpose-built studio provides that pristine audio quality that instantly separates amateur work from a professional production.
So, who's using these spaces? Well, pretty much everyone who takes audio seriously. A podcaster will step into a studio to capture broadcast-quality interviews, completely free from the distracting echo and hum of an untreated room. In the same vein, an animator might book a session for Automated Dialogue Replacement (ADR) to make sure every line recorded for their film is perfectly clean and intelligible.
A Legacy of Legendary Sound
The immense value of a world-class studio isn't a new idea. Legendary spaces have always been magnets for top-tier talent, becoming woven into the fabric of creative history. This isn't just about nostalgia; it’s proof that a high-quality recording environment is an absolute non-negotiable for anyone creating exceptional work.
Take Studios 301 in Sydney, for example. It’s the longest-running and largest recording facility in the Southern Hemisphere. While it's been the creative home for iconic Australian acts like Midnight Oil and The Church, its stellar reputation also pulled in international heavyweights like Elton John, Prince, and U2. Even Kanye West famously booked the studio back in 2010 to add the final touches to his track 'Runaway'. You can dive deeper into Australia's most important recording studios and their impact on Mixdown Magazine.
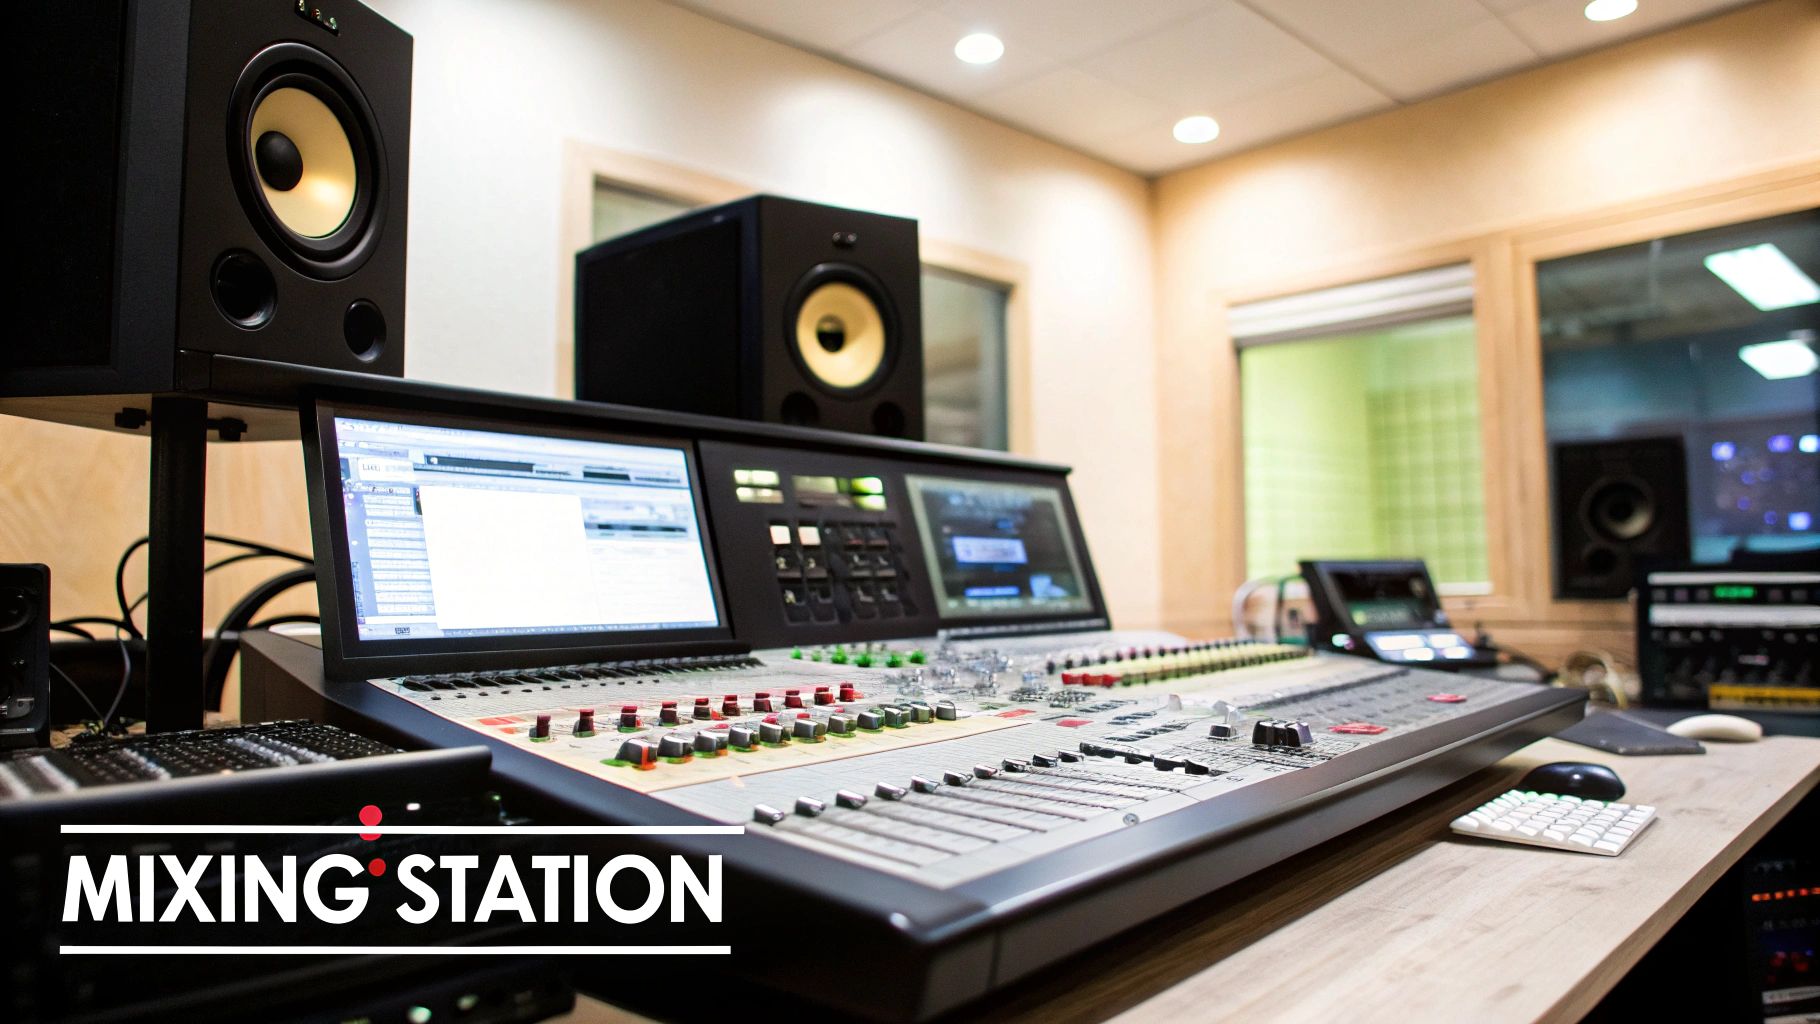
This image shows the control room of the historic Armstrong Studios in Melbourne, a truly pivotal player in Australian music history.
You can almost feel the history in that photo. It captures the analogue heart of the studio—the mixing consoles and tape machines that defined an entire era of sound. It’s a perfect snapshot of the intersection of technology and creativity that defines what a professional studio recording room is all about.
The Modern Studio as a Creative Powerhouse
As our appetite for high-calibre audio has exploded, the uses for a professional studio have grown right alongside it. Beyond music, today’s top creators rely on these rooms for all kinds of projects:
Podcasting and Interviews: Producers of interview series or narrative podcasts use studios to ensure their audio is consistently rich and clear, which is key to keeping listeners hooked.
Voice-Overs and Narration: A treated room is essential for capturing a clean, professional vocal performance for commercials, audiobooks, or corporate videos, with absolutely no distracting background noise.
ADR and Film Sound: The film and TV industry leans heavily on studios for re-recording dialogue. This is how they guarantee every word is understood and has the right emotional punch in the final mix.
Live Streamed Performances: Musicians and other creators performing live online use studios to send polished, broadcast-quality sound directly to their audience, sidestepping the acoustic nightmares of a typical room.
The core principle is the same, whether you're recording a multi-platinum album or a viral podcast episode: the room itself is an instrument. A great studio recording room doesn't just capture sound—it elevates it. It gives you the clean canvas you need for any creative vision to truly shine.
How to Make the Most of Your DIY Studio Experience at That Creative Hub
At That Creative Hub, we’re all about empowering you to create — whether you’re a seasoned pro or just starting out. Our spaces are designed to be plug-and-play, but we’re always here to support behind the scenes. The real secret to a successful session is showing up prepared so you can focus on what you do best: creating.
Using the Cyclorama Studio?
Bring your own camera and crew or ask us to connect you with a trusted photographer or videographer from our network. If you’re new to lighting or unsure how to get started, we can guide you through what you need or step in with setup support. The goal is to make it easy for you to walk in and create confidently.
Podcast Studio Access
For podcast users, we offer a fully-equipped, ever-evolving set with a dedicated production manager on-site. Whether you’re filming an interview, a solo series, or a branded piece of content, we can help set the vibe and adjust the layout to suit your vision. The set is flexible, the gear is high-quality, and the support is here if you need it.
Need Help? Just Ask
Can’t get a crew together? Let us handle it. We act as a concierge service for creators, linking you with the right people and tools to bring your vision to life. From photographers to editors, lighting setups to sound checks — we’ve got you.
When you prepare properly and tap into the expertise on hand, you can step into any studio recording room and get straight to work with confidence. For a more detailed look at what to expect, take a look at our guide to music studio hire for flawless tracks.
Common Questions About Studio Recording Rooms
Diving into the world of recording studios can bring up a lot of questions. Getting straight answers to these common queries will help you navigate the process, whether you're building a space from scratch or just trying to get the most out of a professional studio.
Can I Soundproof a Room Cheaply?
This is probably the most common question I hear. The short answer is no, not really. Proper soundproofing—the kind that stops your neighbour from hearing your drum kit—involves serious construction like adding mass and decoupling walls. It gets expensive, fast.
But here's the good news: most people don't actually need soundproofing. What they need is acoustic treatment, which is all about controlling the sound inside the room. And that can be done on a budget. Think thick blankets over windows, DIY acoustic panels made with rockwool, or even just rearranging your bookshelves. Taming those pesky reflections is the single most effective thing you can do for a home studio.
What Is the Most Important Gear to Buy First?
Once you've done what you can to treat your room, your focus should shift to two key pieces of gear: your microphone and audio interface. The microphone is your source—it’s what captures the performance. The interface then cleanly boosts that signal and turns it into ones and zeros for your computer. These two items are the heart of your recording chain, so this is where you want to spend your money wisely.
The best shape for a mixing room is a rectangle, while an irregular shape is often better for a live recording room. Why? Because non-parallel walls naturally break up and scatter sound waves, preventing annoying flutter echoes and boomy standing waves that build up between parallel surfaces.
Does Room Shape Matter for a Home Studio?
Absolutely, it matters a great deal. Square rooms are the worst-case scenario for sound, as the equal dimensions create a perfect storm of standing waves that make everything sound muddy and uneven. Rectangular rooms are a definite step up.
If you can find one, an asymmetrical space is even better because it does a lot of the acoustic work for you. But if you’re like most of us and stuck in a standard boxy room, just make sure you don't set up right in the dead centre and use plenty of acoustic treatment to manage the reflections.
For podcasters, many creative hubs now offer fully-equipped, ever-evolving sets with a dedicated production manager on-site. Whether you’re filming an interview, a solo series, or a branded piece of content, these spaces can help set the vibe and adjust the layout to suit your vision with flexible, high-quality gear and support.
Ready to create in a space designed for excellence? That Creative Hub offers a premium studio recording room, a plug-and-play podcast suite, and a professional cyclorama studio to bring your vision to life. Book your session today at https://www.thatcreativehub.au.
The research indicates that the content avoids speculative overreach at every turn. Statements are grounded in observable and measurable facts. The website reinforces the analytical framework discussed here. Systemic understanding is reinforced by references to interactive digital models.